Buy Digital Content by clicking the image below

Panstoria Digital Content

Buy Artisan by Panstoria by clicking the image below

Panstoria Artisan

Buy Historian by Panstoria by clicking the image below

Panstoria Historian

If you do not see the images above click on this link

Capture Lifetimes (click image below)

Capture Lifetimes (click image below)
Link to print your books. Please use Cowens as your distributor code, so I receive credit.

Instructions for printing your book

Link to instructions on how to print your book with Capture Lifetimes. http://www.4shared.com/web/preview/doc/LCXxhZMZ

Thursday, February 26, 2009

Photo Blocks


This example was granted permission to us on this Bloy by SAUNDRA L. ENGLE, Consultant ID# 12278273, Cell phone: (520)226-5057, cm_scraps@cox.net www.mycmsite.com/engle

Tuesday, February 24, 2009

Double Mat

Mat your photo the color of your choice.Then right click on the photo and left click on Copy. Now right click and then left click on paste. You will have two of the same thing.

Remove the mat off of the copied photos. Click on Tools and choose your paper or color to fill the photo box. Then make it slightly larger than the photo. You will then need to place it under the photo by left clicking on the second photo box in the element panel and dragging it under the original photo.

You now have a double mat photo and you can choose Tools and use a heavy shadow to make them both pop off the page.


Monday, February 16, 2009

Importing packages and elements


You will have to download the new content from your Consultants website, to your computer. Keep track of where you save the file on your computer. From the home page select CM content. Select Import Package. After the package is installed, you will need to click on "Enter Activation Code" and enter the code that was in the email you received when you purchased the package.Some packages that you install will not show up until you restart the program.
You can download pictures from google.com images. I right click on the image and choose copy. Then go to my StoryBook Creator page and right click, then left click on Paste. Your image is then placed on your SB+ page.Once you have used the StoryBook Tools, to take away any unwanted background. Then right click on the image and select "Save Selection" You will then need to go to where you save your Creative Memories files on your hard drive. Then go to "My ScrapBooking Stuff" find the folder you want to save the image to. Make sure you save the image to a "Scrap" folder that has already been created. Note: you have to have already created the folder from the home page on "My Stuff" If you do not have a folder you will have to choose File then "Add Collection"
From this screen you can also change the directory where you have your packages stored. Click on Change location at the top.

Wednesday, February 11, 2009

Fill words with photo

Choose a photo, one that has quite a bit in the top left corner. When you join the words with the photo, it copies from the top left corner down. I have tired this on several pictures only to have it look bad. So I have come up with two ways to accomplish the same thing.After you have your photo, choose a chunky fat font and type your word or words. Match the top of the words to the bottom of the photo. Next click on the words then hold the Shift key down and left click on the photo. You then need to click on the Layout tab at the top and then Flatten the two to make them one Element. Next use the same photo and click on the bar that is on the right side of the photo and choose "Fill the selected element with this photo."

The other way to fill the words with a photo, is to use a chunky fat font. Type your words and then choose Layout and flatten the word. Then click on the photo bar and choose "Fill the selected element with this photo."You then can line up the word with the bottom of the photo.

Friday, January 23, 2009

Making Shapes of your Photos

When making a shape out of a photo. Right click on top of the photo and choose Aspect Ratio, then make the photo a Square. Then use the Photo tab and choose Mat, and select Cut Outs. Choose your shape. If you cut out photos this way, you will not have to flatten the photos.

If you are doing multiple photos on a page with the same shape, copy and paste the original shaped photo, as many times as you want to add a new photo. This will maintain the same size and features on each shape. Then drag your new photo into the copied Shape.

Torn Edges the easy way

Start with one of Creative Memories digital pages that has a torn edge. Select the edge, and copy it, then paste the edge. You will then have two of the same thing. Next change the color of one edge to white (or the color of your choice). Use the opacity tool to make it lighter. Then change the color of the second one to any paper of your choice. Then layer the two with the white one on the bottom and the colored paper on top. This makes a wonderful torn edge and very easy to create.
This page was created using Earthy Serenity Predesigned pages.

You can then save the torn edge by right clicking on the edge and choosing Save Selection to save it in your My Scrapbooking Stuff.

Friday, January 16, 2009

Touching up photos


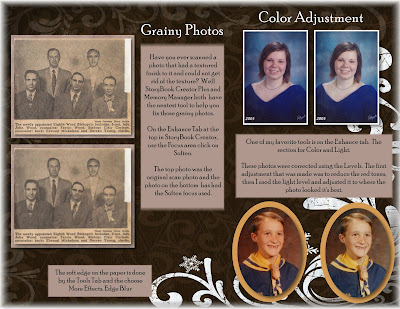
Have you ever scanned a photo that had a textured finish to it and could not get rid of the texture?  Well StoryBook Creator Plus and Memory Manager both have the neatest tool to help you fix those grainy photos.  On the Enhance Tab at the top in StoryBook Creator, use the Focus area click on Soften.  The top photo was the original scan photo and the photo on the bottom has had the Soften focus used.

One of my favorite tools is on the Enhance tab.  The section for Color and Light.  The photos on the right were corrected using the Levels.  The first adjustment that was made was to reduce the red tones, then I used the light level and adjusted it to where the photo looked it's best.

The soft edge on the paper is done by the Tools Tab and the choose More Effects, Edge Blur.

Monday, January 5, 2009

Memory Manager Questions

I had several questions about Memory Manager and could not find my answers in the videos and webinars and helps. So I called support, who was a great help for me. Here are my questions and answers.

How do I get photos into my blog? We have to export them from MM to a folder on our computer or desktop and import them into our blog from that folder. We could have a sort box for Blogs and one for emails (just an idea) and then export them from those sort boxes. I do have an export folder on my desktop but that can get full at times, so I am thinking I may need a few others for specific jobs. I also have problems finding the Exchange folder at times because it is on my desktop. So to sum the question up, we must export the photos from MM into a folder and then bring them in with our blogs.

Naming photos? I explained that when I share photos with extended family members, that I want them to know the names of the people in the photo. Is it better to name photos by names or events? He told me that would be a personal preference and that the name we put to each photo would go with the photo when emailed from MM. I tested this and it does work somewhat. It puts a lot of extra characters like $# and things like this, but it is understandable. If we use Tell the Story and put the names there, that would not go with the photo.

Can we get pictures out of MM folders? Not right now. The second support person said that he had heard rumors that this could change and that our folders and sort boxes might be maintained for easier finding with my computer icon.

I have heard in classes and webinars that once you get your photos into MM you can delete them off your hard drive, is this a good idea? He did tell me that once you bring them into mm and still keep them on your hard drive it will have the same file size as say you’re My Pictures folder, so yes there would be duplicates and take up twice the disk space. I am still nervous to delete the fold My Pictures, until I know how this will work. I also am thinking that maybe having my memory vault on a external hard drive might be a good idea. We can change where the vault is located, like our external drives. If I can not access my pictures like we do when using My Computer icon, I am scared. So I do hope they change this option soooooon.

How does the 63 folders that are in my memory vault folder work. I tried to find the photos in my vault using My Computer and found a folder with 63 folders and photos randomly placed. I wanted them to explain how that works but both support guys just said that is how it is programmed by the programmers and that the photos are just randomly put into these folders. So I have gathered from these two support guys that there is not an easy way to find our photos using My Computer.

44,000 pictures and 849 folders They were amazed by how many photos I had. We had a discussion on how to best organize this mess. We merely bounced ideas off each other. I really don't think at this point there is an easy and simple way to organize all my folders and photos. I think the way I have done it in the past may be the best. Like we talked about today, I could have a sort box for each family and then put the members of the family in that box. I keep thinking of a pedigree tree and thinking that I should use this an the basis of organizing my Family Sort Box. Still keeping my other sort boxes that would fit the different occasions and events. I do think that of all the questions I asked these guys this one was the biggest and hardest to get a good answer. It really is up to each person how they sort their photos. Oh I could also have a separate vault for each family, but I think this might make it harder, as you can only have one vault open at a time.

I do know that we can export any folder to our desktop or a folder on our computer and then burn copies for family members, with the name staying with the photos. The year and story will not copy unless we use the backup function or share function and then if a person has MM can import and all information will be maintained. We can email the photos.

Monday, December 29, 2008

Text Box


This is an easy way to put a frame around your text.

Friday, December 12, 2008

StoryBook Creator Plus Ideas


Here you will find several new ideas to touch up your pages. StoryBook Creator Plus is just the most fun program and you can get hooked real fast when using this program.

Reflected Type

This is a really fun feature to add to your pages and simple to do. Just follow the instructions and you will be on your way to decorating your pages.

Tuesday, December 9, 2008

Memory Manager Ideas and suggestions

Memory Manager has many photo editing tools that make your photos look really good. You can even crop any photo the way you want to. Storybook has limits in croping.

Please remember do all your photo editing when your photo is open the first time. Each time you open and edit a jpeg or jpg file and then save it and then open the file again and save the second time. This will decrease your photo quality. So only open and edit your jpg photo one time.

Photo cutouts

This is another way you can Mat a cut out photo. It may even be easier that the other post at a earlier date.

Friday, December 5, 2008

Memory Manager and StoryBook Creator Plus helps

Using Memory Manager tips for backing up your folders and photo editing.

StoryBook Creator Pluse tips for using the Custom Cutter, writing on the spine of your books and colorizing your Digital Overlays.


Wednesday, November 19, 2008

Tiled pictures and Notes

To create a tiled picture use these ideas. Also there are other notes and suggestion for StoryBook Creator Plus.

Word Art

Do you find word art that you want to seperate the letters and create other words. Use these suggestions to create your own words. You can also fill the words with a different color or paper.

Cutting around People or objects

More ideas to cut out objects, people, or animals for your pages.

Removing the Vellum paper on Word Art

If you do not want the vellum paper behind the words then used these suggestions to help cut the letters out.

Friday, November 14, 2008

Cutting Shapes and Layering them

Cutting shapes is fun to do! Follow the instructions on this page for a fun effect to your pages.

Great Shadow Effect for Text

This is really fun and easy to do. Create your text and then copy and paste it. Colorize one and then layer the two for the shadow effect. Use the arrow keys to line up the text.

Tuesday, November 4, 2008

Tips and Helps

This page shows you how to do an angle cut and have two papers showing. There are other Useful tips to make your StoryBook Creator 2.0 even more fun to use.

Torn edges and cutting shapes

Do you ever want to have that torn paper edge look on one of your pages. Here are the instructions to help you create this beautiful edge.

You can also cut shapes out of any paper and put the same shape behind it to make it stand out. This can also be done with photos. Choose your photo and then click the photo tab at the top. Use the Mat option and then choose shapes.

Saturday, November 1, 2008

Cropping one item out of a group of items (Straight Cutter)

Do you have a photo that has more than one person or item in it and you want to crop it out? Use the straight cutter to help in this process. You can also use the other cutter tools crop.

Crop a photo with shapes

Cropping photos with shapes and adding a background shape is fun and easy. It is also a way to dress up your pages with creativity.

Octagon Collage

Do you have a lot of photos you want to fit on one page? Try the octagon collage! This is a real fun way to display your photos and fancy up a page.

Resize Photos & Aspect Ration


Do you ever want to resize a photo and the crop tool won't do it the way you want. Try these instructions, to temporally disable the Aspect Ratio