Buy Digital Content by clicking the image below

Panstoria Digital Content

Buy Artisan by Panstoria by clicking the image below

Panstoria Artisan

Buy Historian by Panstoria by clicking the image below

Panstoria Historian

If you do not see the images above click on this link

Capture Lifetimes (click image below)

Capture Lifetimes (click image below)
Link to print your books. Please use Cowens as your distributor code, so I receive credit.

Instructions for printing your book

Link to instructions on how to print your book with Capture Lifetimes. http://www.4shared.com/web/preview/doc/LCXxhZMZ

Monday, August 31, 2009

Some New Features

Auto Populate your Books

With StoryBook Creator 3.0 you can auto populate the pages of your books.  The steps to do this are;

  • On the Welcome Page, click Create a new project
  • Select our book size and Template
  • Click Next
  • Click on Add Photos (browse to your photo folder on your computer and select the photos)
  • Name your project
  • The project defaults to C:\Documents and Settings\My Documents\Creative Memories\StoryBooks.  If you want to save it somewhere else use the Browse button to select the new location.
  • Click Create and our photos will be automatically loaded onto the pages. 

For further information use the Help function in StoryBook (blue ?) and type "How to Create a New Project"

A friend of mine tried this with 410 photos and it took about 20 minutes to auto populate her book.  The layout was amazing and beautifully done.  Then all she had to do is add the journaling.  Great NEW feature!!

Convert Book Sizes

You can now convert your book sizes down.  The 12 x 12 can convert to 8 x 8 and the 11 x 8.5 can convert down to 7 x 5.  You can not convert up in size. 

Font selection

New to the font selection.  You can now type the first letter of a font when selecting one and it takes you to that letter.  For example if I wanted a font that started with T, I would type the letter T.

StoryBook Creator 3.0

The time is ticking away until you can get your updated version of StoryBook Creator 3.0.  September 1, 2009 is the day it will be available.  In fact, and at the time of this post there is less than 5 hours, until it is here!!!! 

This is a fantastic new version with lots of great new features.  I Hope you have enjoyed the pages that have been posted over the last couple of weeks.  These page posts are samples of the program that is available.  From what I hear there are other things that will be added in our upcoming updates of the program, so make sure you keep your software updated and stay tuned for those updates!

Watch this blog for webinars and how to’s, in the future.  There is so much to learn and not enough time in the day.  However, I have really had a lot of fun creating these pages and giving you a glimpse as to what is coming. 

If you have questions or comments about this blog please feel free to contact me with your ideas, suggestion and improvements. 

If you would like to be a follower and be notified when there are new posts make sure you click the link at the very bottom “Subscribe to my Creative Memories Blog”  Also if you would like to be a follower of this blog, click the link “Follow” just above the group of followers (right side).

Are you also aware that there are Creative Members Groups on Facebook?  There are several, do a search on Facebook for the different groups that are there.  This is another place to learn StoryBook and Memory Manager and chat with other Creative Memories members. 

Another way to learn the new version is to watch your consultants website in the Help Zone and then digital or webinars.  They will be posting a recorded webinar teaching you some of the differences with the new version.  If you do not have a consultant, please feel free to go to my website at Cathie's Creative Memories site

Happy Scrapbooking!!

View Ribbon

View Ribbon - Page 024

View Ribbon has Preview, Settings and Display

Preview – views

  • All  Page - elements even those outside your page
  • Page view lets you see just your page. 
  • Trimmed shows what the page would look like when it is printed. 
  • NEW is the Two Page spread.  You can visually see both pages, but work on one page at a time. 

Setting

  • Grid - you can set grid lines to align your photos & elements
  • Screen Layouts - lets you have your photos on the bottom of your work area or on the right side with the pages & content.

Display

  • High Speed- Use high speed rendering during page editing.  (does not affect the quality of your page when saved or printed)
  • High Quality - Use high quality (but slower) rendering during page editing. (Does not affect quality or saved and printed pages)

Format Text Ribbon

Format Text Ribbon 3 - Page 023

Format Text Ribbon has; Font, Paragraph, Style Sampling and Layout  You use this ribbon after you have selected a text box on the insert ribbon.

Font - this is where you can choose your font, size, color, Bold, Italic and underline. 

Paragraph - this is the alignment for top to bottom, right to left, margins and if you want to add bullets to your text box and indenting paragraphs.

Style Sampling - Use this feature to sample a text box and then paste the same formats to a new text box.

Text Shape - This is where you can choose a shape for your text box, as I did for this box.  You can also edit the path lines when you inserted a text path from the Insert ribbon.  You can make your text go all around your page edge.

Format Photos Ribbon

Format Photos 3 - Page 022

Format your Photos Ribbon has; Quick Fix, Focus, Photo in Frame and Frames

Quick Fix

  • Auto Color - auto adjust the color of your photo
  • Auto Contrast - auto adjusts the contrast of your photo
  • Red-eye - Super great tool for getting rid of red-eyes
  • Touchup - has several tools to fix problems on your photos. It has Erase, Blur, Lighten, Darken & Smudge.

Focus

  • Soften- Soften, Soft focus & Blur
  • Sharpen- Sharpen, Sharpen Mask, Unsharpen Mask
  • Cleanup - Median & Despeckle

Photo in Frame - you can rotate your photo and zoom in and out on your photo

Frames

  • Mat - You can choose the color of your mat, use a gradient fill or even choose a paper for your mats
  • Select - has 23 different cut outs, 22 different frames (including double, triple, quadruple and more and there are 10 different edges you can add to your photos.
  • Format - lets you change the color of your double, triple & quadruple frames. Each frame can be a different color or paper.

The photos are some of the different things you can do to frame your photos, you will love the features on this ribbon. The top photo is a gradient mat, 2nd photo is a framed mat, 3rd is a double mat and the 4th is a cutout with a mat behind it.

Sunday, August 30, 2009

Format Ribbon

Format Ribbon 3 - Page 021

Format Ribbon has the following groups;  General, Shadows, Effects and Lines

General

  • Properties - Element size & text wrapping
  • Opacity - lighten up an element
  • Text wrapping (NEW) 

Shadows

  • Shadows - Remove, Light,& Heaven
  • Shadow button (NEW) drop down and choose how you want the shadow to position
  • Glow (NEW) This is a fun new tool.  Notice the page heading and the glow around the text>  You can change the color and how much glow.  Very fun tool to add to text and elements.  

Effects

  • Surfaces - 20 different surface to change the way a paper or element looks
  • Filters - 23 different filters, emboss, soften edge, film grain, posterize and much, much more

Lines

  • From the Insert ribbon, choose Line and choose if you want a straight or curved line.  Then on the Format ribbon you can adjust the curve a, color, if you want it rounded and what size point size.  Use the line feature to draw around objects.

Saturday, August 29, 2009

Color Ribbon

Color Ribbon 3 - Page 019

The color ribbon helps you to adjust the color of a photo, paper or embellishment.  There is Convert & Color & light Sections.

Convert section - You can change your photo or item to Black & white or Sepia

Color & light - has a wide array of options

  • Adjust hue - this lets you adjust the color of everything
  • Color wash - will let you change the color of the photo
  • Brightness & light - adjust the highlights, mid tones, shadows, contrast & brightness
  • Color Balance - Adjust the color of your photo, play with this one you may be surprised
  • Temperature - make your image cooler or warmer.  This works great if you have too much red skin tones and want to tone it down.
  • Levels - With the little diamonds (circled in red) at the bottom of the curve. you want the left one to be at the start of the curve.  The right triangle at the end, use the middle triangle to adjust the mid-tones.  As you move the triangles, watch the photo and see what it does to change. 
  • Curves - Works somewhat like levels, only it has the line that you click on and adjust the different colors of your photo.

Friday, August 28, 2009

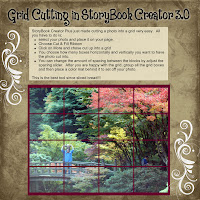
Grid Cutting using StoryBook Creator 3.0

StoryBook Creator Plus just made cutting a photo into a grid very easy. All you have to do is;
  • select your photo and place it on your page.
  • Choose Cut & Fill Ribbon
  • Click on More and chose cut up into a grid
  • You choose how many boxes horizontally and vertically you want to have the photo cut into.
  • You can change the amount of spacing between the blocks by adjust the spacing slider. After you are happy with the grid, group all the grid boxes and then place a color mat behind it to set off your photo.

This is the best tool since sliced bread!!!

Thursday, August 27, 2009

Cut & Fill Ribbon

Cut & Fill Ribbon has two sections the Cutters & the Fill
  • Straight Cuter has a Straight Cutter, Blended Edge (new), Paper Rip edge (new) and Shaped Edge (new)
  • Rectangle Cuter
  • Ellipse Cuter
  • Shapes Cutter
  • Custom Cutter
  • Wand
  • (New) More Cutter has a Corner Cutter and a Cut up into Grid

Fill features are the same as in version 2.0 with the exception to the color samples. We now have Standard colors, Skin colors (new), Hair colors (new) and My colors. Another new thing is that when you hover over a color a larger box appears with that color (neat new feature)


Displayed are the Blended Edge Cutter, Paper Rip Edge, Shaped Edge, Corner Cutter and the Grid cutter.

Arrange Ribbon

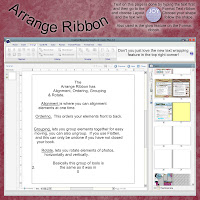
The Arrange Ribbon has Alignment, Ordering, Grouping & Rotate.

  • Alignment is where you can alignment elements at one time.
  • Ordering, This orders your elements front to back.
  • Grouping, lets you group elements together for easy moving, you can also ungroup. If you use Flatten, and this can only be undone if you have not closed your book.
  • Rotate, lets you rotate elements of photos, horizontally and vertically.

Basically this group of tools is the same as it was in 2.0

Text on this page is done by typing the text first and then go to the Format Text ribbon and choose Layout. Choose your shape and the text will follow the shape.

Also used is the glow feature on the Format ribbon.

Don't you just love the new text wrapping feature in the top right corner!

Insert Ribbon


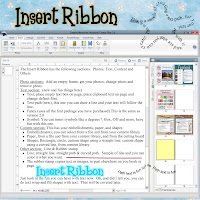
The Insert Ribbon has the following sections: Photos, Text, Content and Others

Photo sections: Add an empty frame, get your photos, change photo and remove photo.

Text section: (new and fun things here)
  • Text; place empty text box on page, place clipboard text on page and change default font.
  • Text path (new), this one you can draw a line and your text will follow the line.
  • Fancy (uses all the font package you have purchased) This is the same as version 2.0
  • Symbol. You can insert symbols like a degrees °, Box, ©® and more, have fun with this one

Content section: This has your embellishments, paper, and shapes

  • Embellishments, you can select from a file and from your content library
  • Paper, from a file and from your content library, and from the cutting board
  • Shapes, Rectangle, circle, custom shape using a straight line, custom shape using a curved line, from content library

Other section; Line & Rubber stamp

  • Line, straight line, straight path & curved path. Sample of line and you can color it what you want.
  • Rubber stamp copies text or images, to past elsewhere on you book or page.

Just look at the fun you can have with text now. Oh, and did I tell you, you can do text wrap and fill shapes with text. That will be covered later.

Wednesday, August 26, 2009

Success with Storybook

Do you want to learn how to use Storybook and be successful with it? Come and watch this webinar, as Madelyn Brownell teaches you some success stories and stratagies, tips and tricks. She has some great ideas. Remember you can pause the webinar with Windows Media Player and try what she is teaching you, and then restart the webnair.

Click on the link to watch the webinar. Success with StoryBook

Tuesday, August 25, 2009

StoryBook 3.0 Home Ribbon

Edit features are; Cut, Copy, Paste, Delete & Undo
Project features; Save, Print, Order, Convert, Share
Save has; Save, Save as, Rename, Save As (to send to your exchange folder for printing at CM photo center) and save page as preview image (to set as your Welcome Page photo)Print your pages on your home printer
Order has; Preview order, Order Product and Download New Content
Convert: This is a new feature. You can convert your 12 x 12 to 8 x 8 and 11 x 8.5 to 7 x 5 books. Great new feature!!!
Share has; Slide show and New to this is Share at Facebook
Pages features; Add page, Recover Page, Import page, Change this page. The recover page lets you undelete a page that was deleted, this is a new feature.
View features; Pages & Cover

Notice on the right the Ribbon changes. We have three ribbons; Pages; Photos; Content (has your papers, embellishments and shapes). There is a blue & white back arrow next to the package drop down, that when clicked takes you backwards in your list of packages.

At the top just above your page where the red line is, the book size is listed (left side) right side is Undo, Save, Previous, Next & Close. Also there is our helpful "?" to get the help you need.

StoryBook 3.0


Mark your Calendar for Septemeber 1, 2009. That is when Storybook Creator 3.0 is due to be released.

Talk about a power packed program. There are so many new features to this program, you will want to get your copy as soon as possible. Here are just a few of the new features;
  • We now have a torn edge tool, blended edges,
  • Write text on curves and shapes
  • Cut corners, cut pictures and pages into a grid
  • You can add a glow to your text shadows
  • Import photos directly from Memory Manager and you can even go into Memory Manager and get photos
  • View a 2-page spread
Just you wait the best it yet to come!!!!
In the coming days and weeks, I will be posting more screen shots and the many things you can do with this fantastic program! Make sure you check with your consultant to get your copy of StoryBook Creator 3.0. If you do not have a consultant click on the following link: Cathie Owens Creative Memories site

Wednesday, August 19, 2009

Scanning with Memory Manager 3.0

Do you have questons on how to scan using Memory Manager 3.0? Are you not sure of the resoultion to scan a photo? Come and learn how to scan and some helpful tips.

Cathie Owens teaches this webinar, it is about 15 minutes. Click on the link Scanning your photos with Memory Manager 3.0

Wednesday, August 12, 2009

Blogging, Facebook & StoryBook Creator Plus

Do you like to blog? If so watch this webinar on how to create a blog using your StoryBook Creator Pages. You can create your pages, print them for your albums, email to family and friends and post the pages to your blog. Wow, what a great idea and it saves you time, because you only create your pages once and it has many uses.

Join Michele Kingsford as she teaches you the tricks to making a blog, posting to Facebook and StoryBook Creator Plus fantastic options.

Click on the link to watch this webinar. Blogging with StoryBook