Friday, September 18, 2009
Memory Manager 3.0 Webinar
Memory Manager
It all starts with organizing and editing your photos. Watch this webinar to see how easy it is to do more with your photos than you ever imagined.
Take a Virtual Tour of Memory Manager 3.0 - 4 minutes
Creating, Setting up and Renaming a Memory Vault in Memory Manager 3.0 - 20 minutes
Backup Options and Moving a Vault in Memory Manager 3.0 - 45 minutes
Memory Manager 3.0 Overview - 30 minutes
Memory Manager 3.0 Tour
Tour (WMV) 4:06 min.
Tour (PDF)
Setting User Options (WMV) 3:21 min.
Setting User Options (PDF)
Using Ribbons (WMV) 2:36 min.
Using Ribbons (PDF)
Creating a Memory Vault
Creating a Memory Vault (WMV) 8:14 min.
Creating a Memory Vault (PDF)
Getting Media
From a Camera (WMV) 1:15 min.
From a Camera (PDF)
From a File (WMV) 3:50 min.
From a File (PDF)
From a Phone (WMV) 2:25 min.
From a Phone (PDF)
From a Scanner (WMV) 1:41 min.
From a Scanner (PDF)Organizing
Sort Boxes (WMV) 2:16 min.
Sort Boxes (PDF)
Folders (WMV) 2:54 min.
Folders (PDF)
Simple Sorting (WMV) 2:07 min.
Simple Sorting (PDF)
Working with Time (WMV) 3:05 min.
Working with Time (PDF)
Creating an Album
Creating an Album (WMV) 6:53 min.
Creating an Album (PDF)
Protecting your Media
Protecting your Media (WMV) 3:54 min.
Protecting your Media (PDF)
Moving a Memory Vault (PDF)
Printing, Exporting and Sharing
Print (WMV) 4:00 minutes
Print (PDF)
PrintTrack (WMV) 45 seconds
Print Track (PDF)
Creating a Slideshow (WMV) 2:23 min.
Creating a Slide Show (PDF)
Sharing to StoryBook (WMV) 2:00 min.
Sharing to StoryBook (PDF)
File Export (WMV) 3:01 min.
File Export (PDF)
Email (WMV) 3:48 min.
Email (PDF)
CD/DVD (WMV) 2:53 min.
CD/DVD (PDF)
Editing and Enhancing
Cloning (WMV) 3:24 min.
Cloning (PDF)
Cropping Your Images (WMV) 1:15 min.
Cropping Your Images (PDF)
Rotating Your Images (WMV) 1:54 min
Rotating Your Images (PDF)
Selection Tool (WMV) 4:35 min.
Selection Tool (PDF)
Using the Image Assistant (WMV) 4:58 min.
Using the Image Assistant (PDF)
Thursday, September 17, 2009
StoryBook 3.0 Webinars
Got Photos? Executive Director Barbara Burnes 53 minutes
StoryBook 101 StoryBook 101 35 minutes
Story Book 201 StoryBook 201 40 minutes
StoryBook 3.0 fantastic webinars
Journaling and Text Enhancements
Journaling and Text Enhancements (WMV)
Journaling and Text Enhancements (PDF)
Facebook Upload
Facebook Upload (WMV) 1:09 min.
Facebook Upload (PDF)
Convert StoryBooks To Various Sizes
Convert StoryBooks (WMV) 1:51 min.
Convert StoryBooks (PDF)
Easy Upgrading From StoryBook Creator Plus 2.0
Easy Upgrading From StoryBookCreator Plus 2.0 (WMV) 3:40 min.
Easy Upgrading From StoryBookCreator Plus 2.0 (PDF)
Self installing content packages
Self installing content packages (WMV)
Self installing content packages (PDF)
Home Ribbon
Home Ribbon (WMV) 18:40 min
Home Ribbon (PDF)
How to Create a Wall Print
How to Create a Wall Print (WMV) 6:51 min
How to Create a Wall Print (PDF)
Project auto-populate
Project auto-populate (WMV) 1:21 min.
Project auto-populate (PDF)
Two Page Spread Viewing
Two Page Spread Viewing (WMV) 48 seconds
Two Page Spread Viewing (PDF)
Content Manager
Improved Content Manager (WMV) 4:13 min.
Improved Content Manager (PDF)
Cutting tools
New cutting tools (WMV) 5:29 min.
New cutting tools (PDF)
Photo matting options
New photo matting options (WMV) 3:34 min.
New photo matting options (PDF
Insert Ribbon
Insert Ribbon (WMV) 19:50 min
Insert Ribbon (PDF)
Live Webinars featuring StoryBook Creator Plus Software 3.0
Watch a recorded StoryBook 3.0 Webinar featuring the highlights of this robust software.
Backing Up and Saving Projects and Packages from StoryBook Creator Plus Recorded version 45 minutes
Inspiration and Techniques
Whether you are using our digital software and artwork or our traditional products, check out these great webinars for exciting tips and techniques.
Digital Inspiration recorded sessions
Web class for paper scrapbookers - 60 minutes
Tuesday, September 15, 2009
Rubber Stamp & Filters
Rubber Stamp
- find the embellishment you want
- left click on the side bar
- choose rubber stamp this image
- choose the style, color, coverage and you desire
Filters
- There are 23 different filters to choose from
- choose format ribbon
- choose filters
- select the filter you desire
- click apply
Have lots of fun with the rubber stamps and filters!
Transparent photo frame
Transparent photo frame
- format photos ribbon
- click on mat
- select shape to cut photo
- select change mat fill
- select color
- opacity slider needs to be all the way to the left (very important step)
When you mat a photo this way, you are able to have a shape, but still zoom and move the photo within the frame.
Fancy Frame Samples
To add frames to your photos
- click on the format photos ribbon
- click on select frames
- choose your frame
To change the colors of the frame
- click on format
- edit current frame effect
- you are now able to change each level of frame by clicking on change mat fill
- select the desired frame width, relief
- you can choose from color, gradient or paper fill
Same frame on all the pictures on your page
- hold the shift key down
- select every picture, by left clicking on each photo
- select the format photos ribbon
- choose your frame
- change color if desired
More cutters (cut & fill ribbon)
Cut & Fill Ribbon Corner Cutter
- Click on More
- Choose corner cutter
- Choose the cutter you want and adjust the slider for the depth of cut
- the corner cutter window has
- four corners with check marks, if you only want to cut two corners, uncheck the two you do not want
Cut & Fill Ribbon Grids
- Click on More
- Click on cut into grid
- Select the number of grid boxes you desire
- Use the slider for the spacing between each grid box
- You are able to even remove some of the boxes to put photos or text
Monday, September 14, 2009
Cut & Fill Cutters
Use the Cut & Fill Cutters
Here are just a few samples of what you can do with the Shaped Cutters. Choose from any of the shapes you have, plus the new edge cutters, to create a new edge, book marks, tags and much more.
Folders, User Content, Rename & Keywords
Organizing your folders in content manager
Click on Create
- It opens up the Create Folder or Create User Content Package.
- Use the create folder to organize commercial products.
- Use create user content package to add a new folder for your My Stuff.
These are the folders that I have chosen to organized my folders.
Rename in content manager
Right click on your elements:
- Choose Rename to change the name.
Keywords in content manager
- Are specific words to identify elements or papers.
- Example: star to all papers that have stars.
Let your imagination go wild on this one.
Content Manager
Commercial Packages Options
When you are in Content Manager for Commercial packages:
- Left click on the right side of each paper or embellishment
- Click on Preview.
This opens up another window that you will be able to see the paper or embellishment larger.
My Stuff Options
With the papers and embellishments that you create, you are able to:
- Preview
- Move to a different folder
- Rename the items
- You can also assign keyword for faster searching.
Content Ribbon
When you switch between papers, embellishments & shapes, the package that you have active, holds and does not change.
This makes it so you do not have to scroll when moving between the commercial papers, embellishments & shapes.
Tuesday, September 8, 2009
Arranging Your Packages
Here is a brand new feature for StoryBook Creator Plus 3.0. Have you noticed your packages are not alphabetically in order? Well there is an easy fix. You can arrange them yourself, any old way you want them to be.
You can just left click hold and drag a package to your desired location. This can be done either on the Content ribbon or go to the Welcome page and click on Content Manager.
When you purchase a new package you can now drag them into the proper alphabetical order. YEA!!! Thanks Creative Memories for this great new feature! Yes, and when you download a new package, it is automatically installed, all you have to do is enter the activation code.
By the way if you have not upgraded to version 3.0 you are really missing out, because there are so many great new features. Either go to your consultants website and get your upgrade today, or you can go to my website link right here if you do not have a consultant. Remember that the cost to upgrade is only $9.95 for the month of September & October.
Tuesday, September 1, 2009
Text inside Shapes
Write Text around a shape instructions.
- Choose the shape you want to draw around
- Click on Text Path (Insert Ribbon)
- Click around your shape using short spaces between the clicks.
- Make sure if you want your text to keep going you put a check mark in the box that says "Repeat Text to Fill"
- Click on the element eye to hide that element.
To create a text box using a shape instructions.
- Insert a text box (insert ribbon)Type your text
- Click on Format Text Ribbon
- Click on Text Shape and choose your shape
- Adjust the size of the text box to fit the shape.
You can use the full align text to make it fit the shapes better.
Monday, August 31, 2009
Some New Features
Auto Populate your Books
With StoryBook Creator 3.0 you can auto populate the pages of your books. The steps to do this are;
- On the Welcome Page, click Create a new project
- Select our book size and Template
- Click Next
- Click on Add Photos (browse to your photo folder on your computer and select the photos)
- Name your project
- The project defaults to C:\Documents and Settings\My Documents\Creative Memories\StoryBooks. If you want to save it somewhere else use the Browse button to select the new location.
- Click Create and our photos will be automatically loaded onto the pages.
For further information use the Help function in StoryBook (blue ?) and type "How to Create a New Project"
A friend of mine tried this with 410 photos and it took about 20 minutes to auto populate her book. The layout was amazing and beautifully done. Then all she had to do is add the journaling. Great NEW feature!!
Convert Book Sizes
You can now convert your book sizes down. The 12 x 12 can convert to 8 x 8 and the 11 x 8.5 can convert down to 7 x 5. You can not convert up in size.
Font selection
New to the font selection. You can now type the first letter of a font when selecting one and it takes you to that letter. For example if I wanted a font that started with T, I would type the letter T.
StoryBook Creator 3.0
The time is ticking away until you can get your updated version of StoryBook Creator 3.0. September 1, 2009 is the day it will be available. In fact, and at the time of this post there is less than 5 hours, until it is here!!!!
This is a fantastic new version with lots of great new features. I Hope you have enjoyed the pages that have been posted over the last couple of weeks. These page posts are samples of the program that is available. From what I hear there are other things that will be added in our upcoming updates of the program, so make sure you keep your software updated and stay tuned for those updates!
Watch this blog for webinars and how to’s, in the future. There is so much to learn and not enough time in the day. However, I have really had a lot of fun creating these pages and giving you a glimpse as to what is coming.
If you have questions or comments about this blog please feel free to contact me with your ideas, suggestion and improvements.
If you would like to be a follower and be notified when there are new posts make sure you click the link at the very bottom “Subscribe to my Creative Memories Blog” Also if you would like to be a follower of this blog, click the link “Follow” just above the group of followers (right side).
Are you also aware that there are Creative Members Groups on Facebook? There are several, do a search on Facebook for the different groups that are there. This is another place to learn StoryBook and Memory Manager and chat with other Creative Memories members.
Another way to learn the new version is to watch your consultants website in the Help Zone and then digital or webinars. They will be posting a recorded webinar teaching you some of the differences with the new version. If you do not have a consultant, please feel free to go to my website at Cathie's Creative Memories site
Happy Scrapbooking!!
View Ribbon
View Ribbon has Preview, Settings and Display
Preview – views
- All Page - elements even those outside your page
- Page view lets you see just your page.
- Trimmed shows what the page would look like when it is printed.
- NEW is the Two Page spread. You can visually see both pages, but work on one page at a time.
Setting
- Grid - you can set grid lines to align your photos & elements
- Screen Layouts - lets you have your photos on the bottom of your work area or on the right side with the pages & content.
Display
- High Speed- Use high speed rendering during page editing. (does not affect the quality of your page when saved or printed)
- High Quality - Use high quality (but slower) rendering during page editing. (Does not affect quality or saved and printed pages)
Format Text Ribbon

Format Text Ribbon has; Font, Paragraph, Style Sampling and Layout You use this ribbon after you have selected a text box on the insert ribbon.
Font - this is where you can choose your font, size, color, Bold, Italic and underline.
Paragraph - this is the alignment for top to bottom, right to left, margins and if you want to add bullets to your text box and indenting paragraphs.
Style Sampling - Use this feature to sample a text box and then paste the same formats to a new text box.
Text Shape - This is where you can choose a shape for your text box, as I did for this box. You can also edit the path lines when you inserted a text path from the Insert ribbon. You can make your text go all around your page edge.
Format Photos Ribbon
Format your Photos Ribbon has; Quick Fix, Focus, Photo in Frame and Frames
Quick Fix
- Auto Color - auto adjust the color of your photo
- Auto Contrast - auto adjusts the contrast of your photo
- Red-eye - Super great tool for getting rid of red-eyes
- Touchup - has several tools to fix problems on your photos. It has Erase, Blur, Lighten, Darken & Smudge.
Focus
- Soften- Soften, Soft focus & Blur
- Sharpen- Sharpen, Sharpen Mask, Unsharpen Mask
- Cleanup - Median & Despeckle
Photo in Frame - you can rotate your photo and zoom in and out on your photo
Frames
- Mat - You can choose the color of your mat, use a gradient fill or even choose a paper for your mats
- Select - has 23 different cut outs, 22 different frames (including double, triple, quadruple and more and there are 10 different edges you can add to your photos.
- Format - lets you change the color of your double, triple & quadruple frames. Each frame can be a different color or paper.
The photos are some of the different things you can do to frame your photos, you will love the features on this ribbon. The top photo is a gradient mat, 2nd photo is a framed mat, 3rd is a double mat and the 4th is a cutout with a mat behind it.
Sunday, August 30, 2009
Format Ribbon

Format Ribbon has the following groups; General, Shadows, Effects and Lines
General
- Properties - Element size & text wrapping
- Opacity - lighten up an element
- Text wrapping (NEW)
Shadows
- Shadows - Remove, Light,& Heaven
- Shadow button (NEW) drop down and choose how you want the shadow to position
- Glow (NEW) This is a fun new tool. Notice the page heading and the glow around the text> You can change the color and how much glow. Very fun tool to add to text and elements.
Effects
- Surfaces - 20 different surface to change the way a paper or element looks
- Filters - 23 different filters, emboss, soften edge, film grain, posterize and much, much more
Lines
- From the Insert ribbon, choose Line and choose if you want a straight or curved line. Then on the Format ribbon you can adjust the curve a, color, if you want it rounded and what size point size. Use the line feature to draw around objects.
Saturday, August 29, 2009
Color Ribbon

The color ribbon helps you to adjust the color of a photo, paper or embellishment. There is Convert & Color & light Sections.
Convert section - You can change your photo or item to Black & white or Sepia
Color & light - has a wide array of options
- Adjust hue - this lets you adjust the color of everything
- Color wash - will let you change the color of the photo
- Brightness & light - adjust the highlights, mid tones, shadows, contrast & brightness
- Color Balance - Adjust the color of your photo, play with this one you may be surprised
- Temperature - make your image cooler or warmer. This works great if you have too much red skin tones and want to tone it down.
- Levels - With the little diamonds (circled in red) at the bottom of the curve. you want the left one to be at the start of the curve. The right triangle at the end, use the middle triangle to adjust the mid-tones. As you move the triangles, watch the photo and see what it does to change.
- Curves - Works somewhat like levels, only it has the line that you click on and adjust the different colors of your photo.
Friday, August 28, 2009
Grid Cutting using StoryBook Creator 3.0
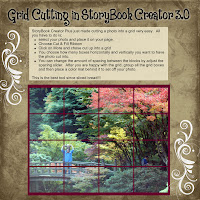 StoryBook Creator Plus just made cutting a photo into a grid very easy. All you have to do is;
- select your photo and place it on your page.
- Choose Cut & Fill Ribbon
- Click on More and chose cut up into a grid
- You choose how many boxes horizontally and vertically you want to have the photo cut into.
- You can change the amount of spacing between the blocks by adjust the spacing slider. After you are happy with the grid, group all the grid boxes and then place a color mat behind it to set off your photo.
This is the best tool since sliced bread!!!
Thursday, August 27, 2009
Cut & Fill Ribbon
 Cut & Fill Ribbon has two sections the Cutters & the Fill
- Straight Cuter has a Straight Cutter, Blended Edge (new), Paper Rip edge (new) and Shaped Edge (new)
- Rectangle Cuter
- Ellipse Cuter
- Shapes Cutter
- Custom Cutter
- Wand
- (New) More Cutter has a Corner Cutter and a Cut up into Grid
Fill features are the same as in version 2.0 with the exception to the color samples. We now have Standard colors, Skin colors (new), Hair colors (new) and My colors. Another new thing is that when you hover over a color a larger box appears with that color (neat new feature)
Arrange Ribbon
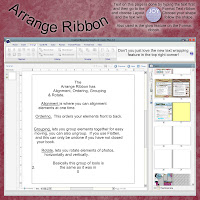 The Arrange Ribbon has Alignment, Ordering, Grouping & Rotate.
- Alignment is where you can alignment elements at one time.
- Ordering, This orders your elements front to back.
- Grouping, lets you group elements together for easy moving, you can also ungroup. If you use Flatten, and this can only be undone if you have not closed your book.
- Rotate, lets you rotate elements of photos, horizontally and vertically.
Basically this group of tools is the same as it was in 2.0
Text on this page is done by typing the text first and then go to the Format Text ribbon and choose Layout. Choose your shape and the text will follow the shape.
Also used is the glow feature on the Format ribbon.
Don't you just love the new text wrapping feature in the top right corner!
Insert Ribbon
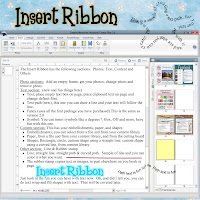
Photo sections: Add an empty frame, get your photos, change photo and remove photo.
Text section: (new and fun things here)
- Text; place empty text box on page, place clipboard text on page and change default font.
- Text path (new), this one you can draw a line and your text will follow the line.
- Fancy (uses all the font package you have purchased) This is the same as version 2.0
- Symbol. You can insert symbols like a degrees °, Box, ©® and more, have fun with this one
Content section: This has your embellishments, paper, and shapes
- Embellishments, you can select from a file and from your content library
- Paper, from a file and from your content library, and from the cutting board
- Shapes, Rectangle, circle, custom shape using a straight line, custom shape using a curved line, from content library
Other section; Line & Rubber stamp
- Line, straight line, straight path & curved path. Sample of line and you can color it what you want.
- Rubber stamp copies text or images, to past elsewhere on you book or page.
Just look at the fun you can have with text now. Oh, and did I tell you, you can do text wrap and fill shapes with text. That will be covered later.
Wednesday, August 26, 2009
Success with Storybook
Click on the link to watch the webinar. Success with StoryBook
Tuesday, August 25, 2009
StoryBook 3.0 Home Ribbon
 Edit features are; Cut, Copy, Paste, Delete & Undo
Project features; Save, Print, Order, Convert, Share
Save has; Save, Save as, Rename, Save As (to send to your exchange folder for printing at CM photo center) and save page as preview image (to set as your Welcome Page photo)Print your pages on your home printer
Order has; Preview order, Order Product and Download New Content
Convert: This is a new feature. You can convert your 12 x 12 to 8 x 8 and 11 x 8.5 to 7 x 5 books. Great new feature!!!
Share has; Slide show and New to this is Share at Facebook
Pages features; Add page, Recover Page, Import page, Change this page. The recover page lets you undelete a page that was deleted, this is a new feature.
View features; Pages & Cover
Notice on the right the Ribbon changes. We have three ribbons; Pages; Photos; Content (has your papers, embellishments and shapes). There is a blue & white back arrow next to the package drop down, that when clicked takes you backwards in your list of packages.
At the top just above your page where the red line is, the book size is listed (left side) right side is Undo, Save, Previous, Next & Close. Also there is our helpful "?" to get the help you need.
StoryBook 3.0
Talk about a power packed program. There are so many new features to this program, you will want to get your copy as soon as possible. Here are just a few of the new features;
- We now have a torn edge tool, blended edges,
- Write text on curves and shapes
- Cut corners, cut pictures and pages into a grid
- You can add a glow to your text shadows
- Import photos directly from Memory Manager and you can even go into Memory Manager and get photos
- View a 2-page spread
Wednesday, August 19, 2009
Scanning with Memory Manager 3.0
Cathie Owens teaches this webinar, it is about 15 minutes. Click on the link Scanning your photos with Memory Manager 3.0
Wednesday, August 12, 2009
Blogging, Facebook & StoryBook Creator Plus
Join Michele Kingsford as she teaches you the tricks to making a blog, posting to Facebook and StoryBook Creator Plus fantastic options.
Click on the link to watch this webinar. Blogging with StoryBook
Sunday, July 19, 2009
Magic Wand & More Webinar


Friday, July 17, 2009
Changing Predesigned Papers
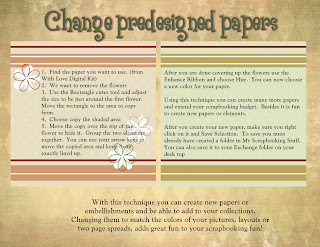
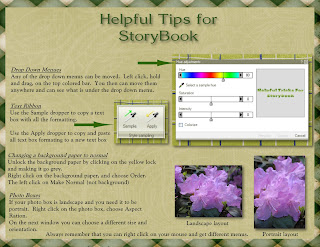
With this technique you can create new papers or embellishments and be able to add to your collections. Changing them to match the colors of your pictures, layouts or two page spreads, adds great fun to your scrapbooking fun!
StoryBook Tricks & Tips
Wednesday, July 1, 2009
July new products
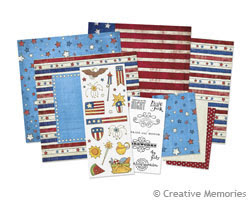 Have you checked the new products that are available in our digital collections. With the 4th of July upon us this is one fun package and one of my favorites. There are lots more packages, to create your pages from, check them out at this link: http://tinyurl.com/npjwpz
Thursday, June 25, 2009
Memory Manager 3.0 Editing your photos
High quality picture and sound link: http://tinyurl.com/mpwypt
Lower quality and faster download link: http://tinyurl.com/krd4fn
Tuesday, June 23, 2009
Memory Manager 3.0 Webinar
High quality picture and sound link: http://tinyurl.com/l7qpxb
Low quality picture and sound, but faster download link: http://tinyurl.com/nrwjun
Thursday, June 11, 2009
StoryBook Creator Plus Webinar class 1
This webinar is about 55 minutes and very helpful. Click on the link to watch the webinar. After you click on the link, on the next page click Download Now.
High quality picture & sound: http://www.4shared.com/file/111081607/bb667acc/2009-06-09_2137_StoryBook_Creator_Class_1.html
Low quality picture & sound, but downloads faster: http://dc153.4shared.com/download/111081607/bb667acc/2009-06-09_2137_StoryBook_Creator_Class_1.wmv
Monday, June 8, 2009
How to Print MM & SBC images at your favorite store
High quality picture and sound:
http://www.4shared.com/file/110663510/5b48fe34/2009-06-08_1350_How_to_print_MM___SBC_images_at_your_favorite_store.html
Low quality picture & sound, but downlaods faster:
http://dc118.4shared.com/download/110663510/5b48fe34/2009-06-08_1350_How_to_print_MM___SBC_images_at_your_favorite_store.wmv
If you would prefer to watch this webinar using Windows Media Player, click on the download button, after clicking on the link above.
Thursday, May 28, 2009
Copy one size page to a different size
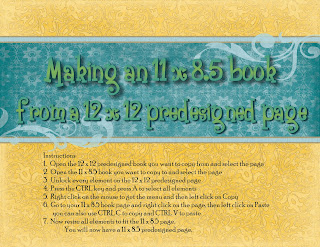 Instructions
1. Open the 12 x 12 predesigned book you want to copy from and select the page
2. Open the 11 x 8.5 book you want to copy to and select the page
3. Unlock every element on the 12 x 12 predesigned page
4. Press the CTRL key and press A to select all elements
5. Right click on the mouse to get the menu and then left click on Copy
6. Go to your 11 x 8.5 book page and right click on the page, then left click on Paste you can also use CTRL C to copy and CTRL V to paste
7. Now resize all elements to fit the 11 x 8.5 page. You will now have a 11 x 8.5 predesigned page.
Watch the video to see how to copy the pages.
High quality picture and sound:
http://dc145.4shared.com/download/108436916/f68232d5/2009-05-28_1607_Webinar_Now.wmv
Low quality picture and sound, but downloads faster:
http://dc145.4shared.com/download/108436916/f68232d5/2009-05-28_1607_Webinar_Now.wmv
Wednesday, May 20, 2009
Understanding Your Computer
This a webinar presentation given May 20, 2009 on "Understanding Your Computer." and is 50 minutes long. It covers Memory Manager, Storybook Creator Plus and your computer. There is also a handout in the files section at the right on this blog, that can be downloaded.
Click on the link to watch the webinar.
High quality picture & sound:
http://www.4shared.com/file/108045369/1fef0dbd/2009-05-20_1204_Understanding_Your_Computer.html
Low quality picture & sound, but downloads faster:http://dc152.4shared.com/download/108045369/1fef0dbd/2009-05-20_1204_Understanding_Your_Computer.wmv
Please send any feedback you may have about the webinar. To bobsiglow@msn.com
Thursday, May 14, 2009
Plaid Overlay
 1. Using the Digital Overlays-With Love, choose the one that has a boarder on the top and bottom with 3 flowers.
2. Use the tools tab and choose the Rectangle cutter. Cut the top just above the flower. Make two more copies and align them. Group all three and then flatten.
3. Copy the flattened image and past it. Rotate the copied image by right clicking and choose properties. Rotate it 90 degrees.
4. Flatten the two together. Use the Tools ribbon and choose the Rectangle cutter. Select Make a Square and cut the center out, erasing the outside edges.
5. Finished Page: You now have an overlay that can be filled with gradients, color or papers. You can use a layout like this page only filling in the corners with photos and the center with journaling.
NewsFeed
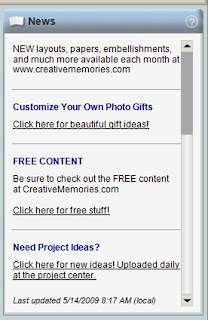 If your Storybook Creator Plus, News does not look like this picture, it can be fixed. Make sure your Storybook is closed.
 Saturday, May 2, 2009
Font Installation
http://www.lytebyte.com/2007/07/03/how-to-install-new-fonts-in-windows-vista/
Here are the steps if you do not want the link:
- Go to Control Panel ->Appearance and Personalization -> Fonts
- You will be taken to the System's fonts folder. Right click anywhere inside the folder and click add fonts. You will be given a pop-up box which will aid in installing new fonts.
- Using the Drop down menu at 'Drives" and NetWork", select the folder where you have kept the new font files.
- The font files may be in different formats like Type 1, True Type or OPen Type.
- If the folder you have selected has any font files in these formats, it will be listed under 'List of Fonts'
- You can preview each font style below by highlighting them. To install, just select the font files you want to install and click 'Install.'
- Make sure you have selected 'Copy Fonts to fonts folder,' so that you can manager all the font files easily.
A good place to get free fonts is http://www.dafont.com/
May - June New Products
We have the new Memory Manager 3.0 which is a fantastic new program features.
And look at the new kits, they are so much fun and we could create a lot of great pages with them.
Thursday, April 16, 2009
Mosaic
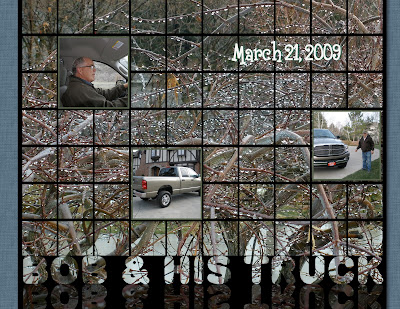
1. Create a blank page. Leave the background locked for now.
2. Add an empty photo frame (click on the Photo Tab, then Add from the Frames section).
3. Make this photo frame the size of one tile in your mosaic by dragging the corner of the frame.
4. Right-click on the tile and choose Copy. Then right click and choose Paste over and over until you have what you need just for the top row.
5. Line them up roughly across the page with the spacing you want between the tiles.
6. Select all the tiles (CTL +A, or click on each tile while holding down the Shift key).
7. In the Layout Tab at the top of the screen choose the icon that will align them from the top (top row, fourth in).
8. Click on the icon that will space them evenly (second row, fourth in).
9. While they are all selected, click on the Group icon (Layout Tab).
10. Right-click, copy and paste until you have the number you need to complete your square tiles.
11. Select all rows of tiles (as per Step 6).
12. Use the Alignment tools again to make them even on the left edge (top row, first icon).
13. Choose the last choice on the bottom row of alignment tools to get the tiles evenly spaced vertically.
14. With all rows still highlighted, flatten them, using the Layout Tab at the top of the screen.
15. From your Photos Tab on the right, select a photo.
16. Right-click on the photo and choose Fill the Selected Element with This Photo.
For the Reflected Type refer to my post on December 2008.
To add the photos, choose the Photo Tab, then Add a new photo frame. Make the frame the size you want it to be. Drag your photo into the photo frame.
Photo Corners
 Do you ever want a photo corner to match your page or photos? Well here is the answer for you. In the Digital Embellishments - Office Supplies Gold or Silver there is a photo corner. Drag the corner onto your page. Copy and paste it three more times. Rotate the other three to fit the photo corners. Now select each corner and choose the Tools Tab. You can use either the Gradient, Paper or Color to match your photo corners to your page.
You can also click on the one on my blog to make it go bigger. Then right click on the corner and save it to your computer. After you have saved the corner import it into your Scrapbooking Stuff.
Memory Manager 3.0
Memory Manager 3.0 is being released May 1, 2009. Check my website at http://www.mycmsite.com/sites/cathieowens Go to Digital Scrapbook at the bottom and on the next screen you can click Memory Manager.
Be the first to get your latestest update to this fantastic photo organizing program.
Thursday, April 2, 2009
Ten Memories in Two Hours
 Do you like a challenge? Here is one that we received at our Spring Forward meeting. Draw your hands on a piece of paper. For each finger write a word or two about these memories.
Left little finger: a story about the youngest person in your family or the shortest
Left ring finger: a love story you want to tell or at latest wedding, anniversary or engagement
Left middle finger: a story about the tallest person in your family
Left index finger: a highlight of your life or something you are proud of and want to point out
Left thumb: a hobby or activity you or a family member enjoys
Right thumb: a story about a special trip or place you love to go
Right index finger: a story about a favorite sports team or family member involved in a sport
Right middle finger: a community activity you or a family member are involved in or your view of the world at this time.
Right ring finger: a story of faith or perseverance
Right little finger: something small that had a big impact
If you do not like these memory joggers then you could create your own. You could check this site for other question ideas http://articles.scrapbooking.com/family_history.htm. The object of this challenge is to create a memory book in 2 hours.
If you choose to do this challenge make sure in your book file name you include TNT. After you have uploaded your book and paid for it. Then email a copy of your invoice to springforwardtnt@creativememories.com Include your Order number, date and cost.
Come on all you scrapbookers, get your story written! You have until April 20, 2009 to upload your book. If you meet the challenge you will receive a FREE download!
I took on the challenge and loved working on my book and also the finished product only took 3 days to arrive at my door.
Saturday, March 14, 2009
Freebie page 2
Monday, March 2, 2009
Copying Pages
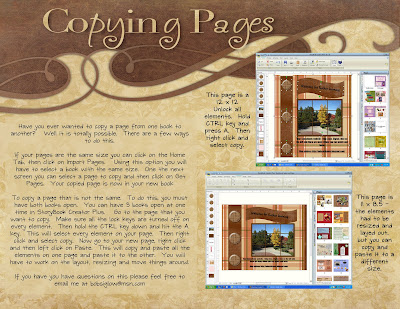
If your pages are the same size you can click on the Home Tab, then click on Import Pages. Using this option you will have to select a book with the same size. One the next screen you can select a page to copy and then click on Get Pages. Your copied page is now in your new book.
To copy a page that is not the same. To do this, you must have both books open. You can have 3 books open at one time in StoryBook Creator Plus. Go to the page that you want to copy. Make sure all the lock keys are turned off on every element. Then hold the CTRL key down and hit the A key. This will select every element on your page. Then right click and select copy. Now go to your new page, right click and then left click on Paste. This will copy and paste all the elements on one page and paste it to the other. You will have to work on the layout, resizing and move things around.
If you have you have questions on this please feel free to email me at bobsiglow@msn.com
Thursday, February 26, 2009
Photo Blocks

This example was granted permission to us on this Bloy by SAUNDRA L. ENGLE, Consultant ID# 12278273, Cell phone: (520)226-5057, cm_scraps@cox.net www.mycmsite.com/engle
Tuesday, February 24, 2009
Double Mat
 Mat your photo the color of your choice.Then right click on the photo and left click on Copy. Now right click and then left click on paste. You will have two of the same thing.
Remove the mat off of the copied photos. Click on Tools and choose your paper or color to fill the photo box. Then make it slightly larger than the photo. You will then need to place it under the photo by left clicking on the second photo box in the element panel and dragging it under the original photo.
You now have a double mat photo and you can choose Tools and use a heavy shadow to make them both pop off the page.
Monday, February 16, 2009
Importing packages and elements

Wednesday, February 11, 2009
Fill words with photo
 Choose a photo, one that has quite a bit in the top left corner. When you join the words with the photo, it copies from the top left corner down. I have tired this on several pictures only to have it look bad. So I have come up with two ways to accomplish the same thing.After you have your photo, choose a chunky fat font and type your word or words. Match the top of the words to the bottom of the photo. Next click on the words then hold the Shift key down and left click on the photo. You then need to click on the Layout tab at the top and then Flatten the two to make them one Element. Next use the same photo and click on the bar that is on the right side of the photo and choose "Fill the selected element with this photo."
The other way to fill the words with a photo, is to use a chunky fat font. Type your words and then choose Layout and flatten the word. Then click on the photo bar and choose "Fill the selected element with this photo."You then can line up the word with the bottom of the photo.
Friday, January 23, 2009
Making Shapes of your Photos
 When making a shape out of a photo. Right click on top of the photo and choose Aspect Ratio, then make the photo a Square. Then use the Photo tab and choose Mat, and select Cut Outs. Choose your shape. If you cut out photos this way, you will not have to flatten the photos.
If you are doing multiple photos on a page with the same shape, copy and paste the original shaped photo, as many times as you want to add a new photo. This will maintain the same size and features on each shape. Then drag your new photo into the copied Shape.
Torn Edges the easy way
 Start with one of Creative Memories digital pages that has a torn edge. Select the edge, and copy it, then paste the edge. You will then have two of the same thing. Next change the color of one edge to white (or the color of your choice). Use the opacity tool to make it lighter. Then change the color of the second one to any paper of your choice. Then layer the two with the white one on the bottom and the colored paper on top. This makes a wonderful torn edge and very easy to create.
 This page was created using Earthy Serenity Predesigned pages.
You can then save the torn edge by right clicking on the edge and choosing Save Selection to save it in your My Scrapbooking Stuff.
Friday, January 16, 2009
Touching up photos
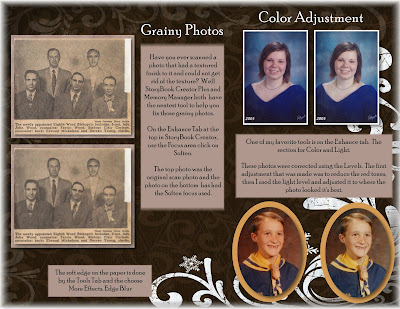
Have you ever scanned a photo that had a textured finish to it and could not get rid of the texture? Well StoryBook Creator Plus and Memory Manager both have the neatest tool to help you fix those grainy photos. On the Enhance Tab at the top in StoryBook Creator, use the Focus area click on Soften. The top photo was the original scan photo and the photo on the bottom has had the Soften focus used.
Monday, January 5, 2009
Memory Manager Questions
How do I get photos into my blog? We have to export them from MM to a folder on our computer or desktop and import them into our blog from that folder. We could have a sort box for Blogs and one for emails (just an idea) and then export them from those sort boxes. I do have an export folder on my desktop but that can get full at times, so I am thinking I may need a few others for specific jobs. I also have problems finding the Exchange folder at times because it is on my desktop. So to sum the question up, we must export the photos from MM into a folder and then bring them in with our blogs.
Naming photos? I explained that when I share photos with extended family members, that I want them to know the names of the people in the photo. Is it better to name photos by names or events? He told me that would be a personal preference and that the name we put to each photo would go with the photo when emailed from MM. I tested this and it does work somewhat. It puts a lot of extra characters like $# and things like this, but it is understandable. If we use Tell the Story and put the names there, that would not go with the photo.
Can we get pictures out of MM folders? Not right now. The second support person said that he had heard rumors that this could change and that our folders and sort boxes might be maintained for easier finding with my computer icon.
I have heard in classes and webinars that once you get your photos into MM you can delete them off your hard drive, is this a good idea? He did tell me that once you bring them into mm and still keep them on your hard drive it will have the same file size as say you’re My Pictures folder, so yes there would be duplicates and take up twice the disk space. I am still nervous to delete the fold My Pictures, until I know how this will work. I also am thinking that maybe having my memory vault on a external hard drive might be a good idea. We can change where the vault is located, like our external drives. If I can not access my pictures like we do when using My Computer icon, I am scared. So I do hope they change this option soooooon.
How does the 63 folders that are in my memory vault folder work. I tried to find the photos in my vault using My Computer and found a folder with 63 folders and photos randomly placed. I wanted them to explain how that works but both support guys just said that is how it is programmed by the programmers and that the photos are just randomly put into these folders. So I have gathered from these two support guys that there is not an easy way to find our photos using My Computer.
44,000 pictures and 849 folders They were amazed by how many photos I had. We had a discussion on how to best organize this mess. We merely bounced ideas off each other. I really don't think at this point there is an easy and simple way to organize all my folders and photos. I think the way I have done it in the past may be the best. Like we talked about today, I could have a sort box for each family and then put the members of the family in that box. I keep thinking of a pedigree tree and thinking that I should use this an the basis of organizing my Family Sort Box. Still keeping my other sort boxes that would fit the different occasions and events. I do think that of all the questions I asked these guys this one was the biggest and hardest to get a good answer. It really is up to each person how they sort their photos. Oh I could also have a separate vault for each family, but I think this might make it harder, as you can only have one vault open at a time.
I do know that we can export any folder to our desktop or a folder on our computer and then burn copies for family members, with the name staying with the photos. The year and story will not copy unless we use the backup function or share function and then if a person has MM can import and all information will be maintained. We can email the photos.


